Missions
A mission is a list of actions that a robot carries out in order, for example “go to Loading dock 2, pick up the pallet, go to Packing station”. The Missions page shows your robots live on the map, together with the missions they are running, waiting to run or have finished.
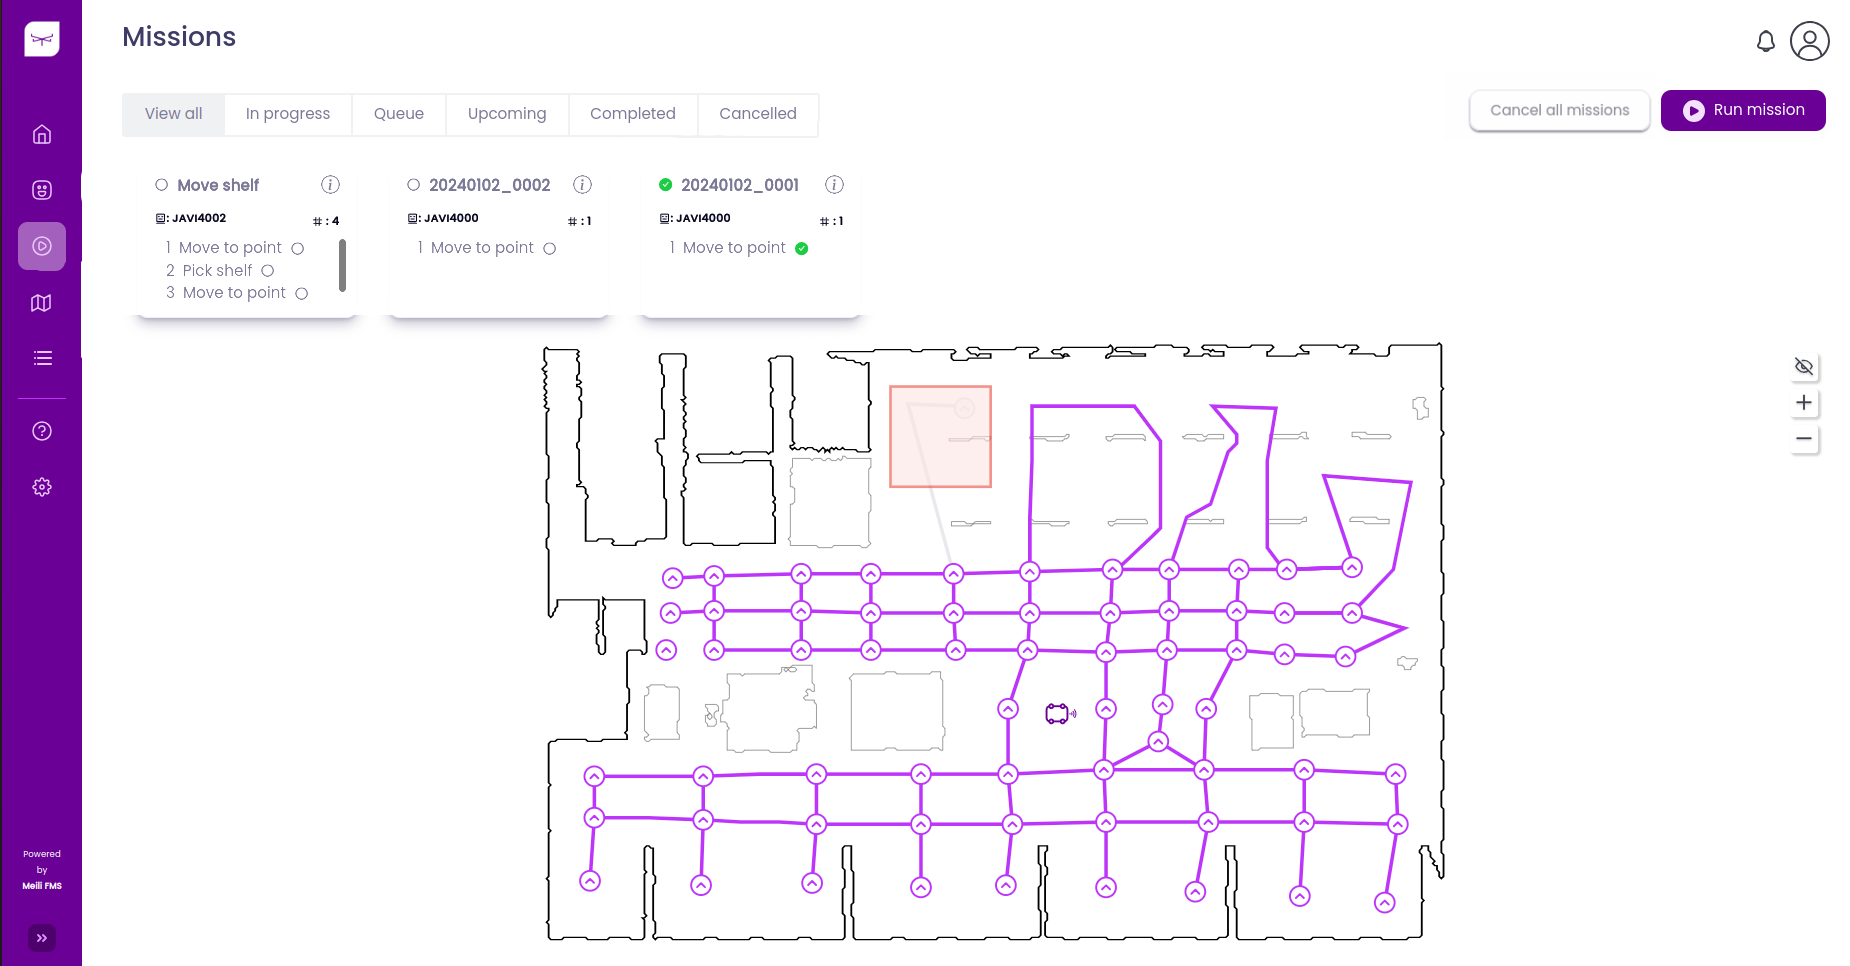
Missions overview
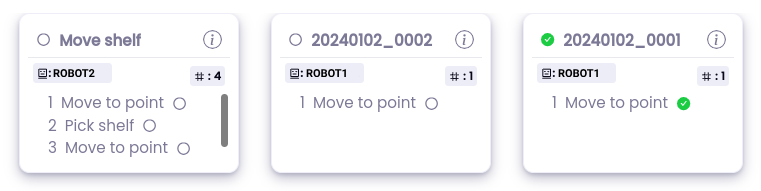
Each mission appears as a card at the top of the page. A card shows:
- The mission number or name.
- The robot that runs the mission, the floor (level) it is on and the estimated time to finish.
- The mission’s actions, with an icon showing which ones are done, running or still to do.
- A loop icon if it is a looped mission.
- A pause icon to pause the mission while it is running, and a play icon to resume it.
- An info icon that opens the mission details. General shows the mission’s name, description, robot, estimated time and actions. Log shows everything that happened to the mission, with times.
Use the buttons above the cards to filter them:
- View all: every mission.
- In progress: missions a robot is working on, including paused missions and missions waiting for a decision.
- Queue: missions waiting to start.
- Upcoming: missions scheduled for later.
- Completed: missions that finished.
- Cancelled: missions that were deleted, failed or stopped before the end.
To see which filter each status belongs to, see Mission statuses.
Send a robot to a station
The quickest way to move a robot is from the map:
- Click the station you want to send the robot to. The Send a robot dialog appears.
- Click
Any robotto let Meili choose the robot, or clickSelectand then click the robot you want on the map.
The robot drives to the station. These missions don’t need to be confirmed.
Run mission
Click the Run mission button in the top right corner to open the mission menu. From there, you can run an existing mission preset or create a new mission (see Create a new mission).
To run a mission preset:
- Select it in the Mission presets dropdown.
- Optionally, choose a Vehicle category and a Robot. If you don’t choose a robot, Meili picks one.
- Fill any other parameters the preset needs, and adjust the options described in Create a new mission if needed.
- Click
Run mission.
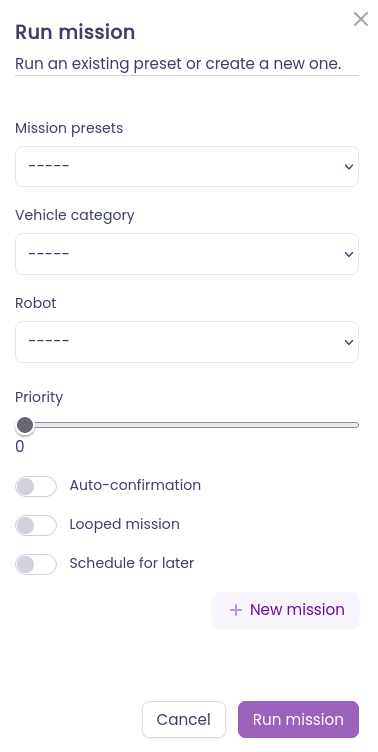
Create a new mission
To create a new mission, click New mission in the mission menu. The menu changes to show the following fields:
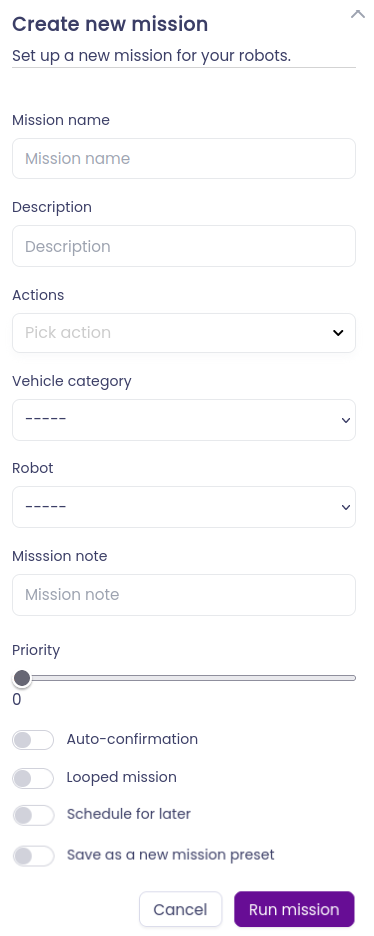
- Mission name: the name of the mission.
- Description: a description of the mission.
- Actions: the actions the robot performs. Pick an action from the dropdown to add it to the list. Actions are carried out in the order they are added. For each action, select the target station and its floor, and fill any extra parameters the action needs. Each action also has its own Auto-confirmation switch (see Mission confirmation).

- Autogenerate movement: see Autogenerated movement.
- Vehicle category (optional): only robots of this category can run the mission.
- Robot (optional): the robot that runs the mission. If you leave it empty, Meili picks one.
- Mission note: a note added to the mission.
- Priority: the priority of the mission. Missions with a higher priority run first.
- Auto confirmation: when on, every action in the mission is confirmed automatically when the robot finishes it. When off, the mission waits for a confirmation after each action that doesn’t have its own Auto-confirmation switch on. See Mission confirmation.
- Looped mission: when on, the mission starts again each time it finishes.
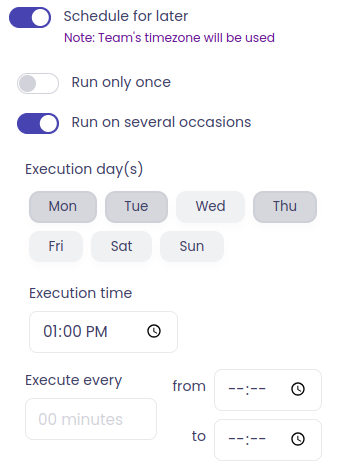
- Schedule for later: when on, the mission runs later instead of now. Choose one of:
- Runs only once: the mission runs once, on the Execution date and at the Execution time you choose.
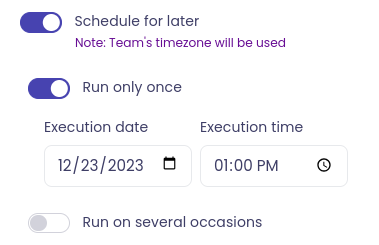
- Run on several occasions: the mission runs repeatedly. Choose Week days to pick the days and time, or Execute every to run it every given number of minutes between two times.
- Runs only once: the mission runs once, on the Execution date and at the Execution time you choose.
- Save as a new mission preset: when on, the mission is also saved as a mission preset so you can run it again later.
Click Run mission to send the mission.
Autogenerated movement
This setting adds “Move to point” actions to the mission for you, so you don’t have to add every movement by hand. It has three options:
- Everywhere: adds a move action whenever an action takes place at a different station from the previous one.
- Zone presets: only adds move actions where the robot passes through zones that need extra steps, such as capacity or action zones.
- Nowhere: leaves the mission exactly as you built it.
Mission confirmation
When a robot finishes an action that isn’t auto-confirmed, the mission waits and a Click to proceed button appears on its card. Click it to confirm the action, and the robot moves on to the next one. Confirming the last action finishes the mission and frees the robot for its next mission.
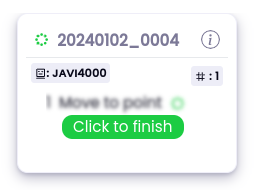
SUbtasks with Auto-confirmation on, or missions with Auto-confirmation on, don’t wait for anyone. The robot moves on to the next step as soon as it finishes the current one.
Turning auto-confirmation off is useful when the robot has to wait at a station for something to happen before moving on, for example an operator loading a pallet onto it or a machine finishing its cycle. The robot stays at the station until the action is confirmed.
The confirmation doesn’t have to come from the dashboard. With a trigger, the operator can press a call button, or the machine can send a signal, to confirm the action and send the robot on its way.
If a robot is waiting to enter a capacity zone that is full, an Override button appears on the card. Click it to let the robot continue anyway.
Mission statuses
Every mission has a status that shows where it is in its life. You can see the status in the mission details and in the Missions tab under Actions.
| Status | Shown under | Meaning |
|---|---|---|
| created | Queue | The mission has just been created and is waiting to start. |
| pending | Queue | Meili is preparing the mission to send it to a robot. |
| sent | Queue | The mission has been sent to the robot, which hasn’t started it yet. |
| rerun | Queue | The mission couldn’t start yet, for example because the robot is busy or a capacity zone on its way is full. Meili keeps trying automatically. The log shows the reason. From the mission details, you can also click Rerun mission and choose Use same robot or Re-assign robot. |
| in_progress | In progress | A robot is carrying out the mission. |
| paused | In progress | A user paused the mission. Click the play icon on the card to resume it. |
| offline | In progress | The robot lost its connection to Meili during the mission. The mission continues when the robot reconnects. Missions that a robot recorded while it had no connection also have this status. |
| await_abort | In progress | The robot couldn’t carry out the mission, and Meili is waiting for a user to decide what to do. See Missions waiting for a decision. |
| await_terminate | View all | The mission stayed in the same status for too long, and Meili is waiting for a user to decide what to do. See Mission timeouts. |
| completed | Completed | The mission finished. |
| failed | Cancelled | The mission couldn’t be completed, or it was deleted or cancelled by a user. |
| aborted | Cancelled | The robot couldn’t carry out the mission, so it was stopped. |
| terminated | Cancelled | The mission stayed in the same status for too long, so it was stopped. See Mission timeouts. |
| completed_offline, failed_offline | View all | The mission was carried out while the robot had no connection to Meili, and it completed or failed. |
Missions waiting for a decision
If Enable user prompt for failed tasks is on in your site settings, Meili doesn’t fail a mission straight away when something goes wrong. Instead, a Continue button appears on the mission card. Click it and choose what to do:
- Assign the mission to the same robot, or Wait for the robot to reconnect if the robot is offline.
- Assign the mission to a different robot.
- Stop the mission (Abort the mission completely, Terminate the mission and do not continue or Fail the mission and do not continue, depending on the status).
If the setting is off, these missions are stopped automatically.
Delete/stop a mission
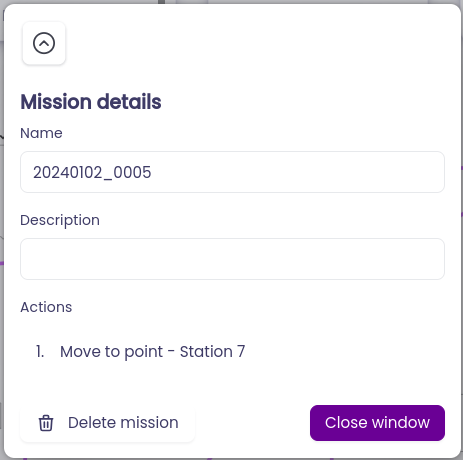
To delete or stop a mission, click the info icon on its card, then click Delete mission and confirm. The mission is marked as failed. Missions that have already finished can’t be deleted.
Cancel all missions
To cancel every unfinished mission in the team at once, click Cancel all next to the Run mission button and confirm. The button is only available while there are missions in progress or waiting to start.
Mission timeouts
The mission timeout behaviour is described in a dedicated page: