Stations and paths
Stations and paths are the network your robots move on:
- A station is a point on the map that robots can drive to, for example a loading dock or a packing station. Robots use stations as destinations or stops in a mission.
- A path is a route between two stations. Robots only drive along paths, so every station a robot must reach needs at least one path.
You create and edit both in the Map editor tab, inside Maps. Make sure the SVG map layer is shown.
Build a network of stations and paths
The fastest way to lay out stations and paths is with the mouse alone, without opening any menu:
- Right-click an empty spot on the map. A station is created there, and a path starts from it and follows your mouse.
- Left-click on the map to add a waypoint. Waypoints shape the route of the path, for example around a corner. Hold Shift to snap them to a grid.
- Right-click to add the next station. It is connected to the previous one, and a new path starts from it.
- Keep going, alternating waypoints and stations, until your network is complete.
- To finish, left-click an existing station to connect the last path to it, or press Ctrl+S (Cmd+S on Mac).
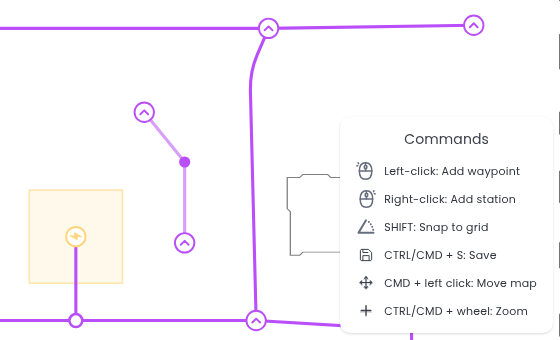
You can also start from an existing station: left-click it and the path starts from there.
Press Esc to cancel what you are drawing. Nothing is saved until you finish, so stations and paths you have not finished yet are discarded.
New stations are named automatically (Station 9, Station 10 and so on). To rename them or change their settings, see Station settings.
Stations
Each station has a name, a position and a rotation, which is the direction the robot faces when it stops there. Besides building a network, you can create a single station from Create station in the side toolbar.
Quick station
Click Create station and choose Quick station:
- Move the mouse to where you want the station and click to place it.
- Drag the rotation handle above the station to set the direction the robot will face.
- Release the handle. The station is saved.
Advanced station
To enter the details yourself, click Create station and choose Advanced station. The New station dialog opens.
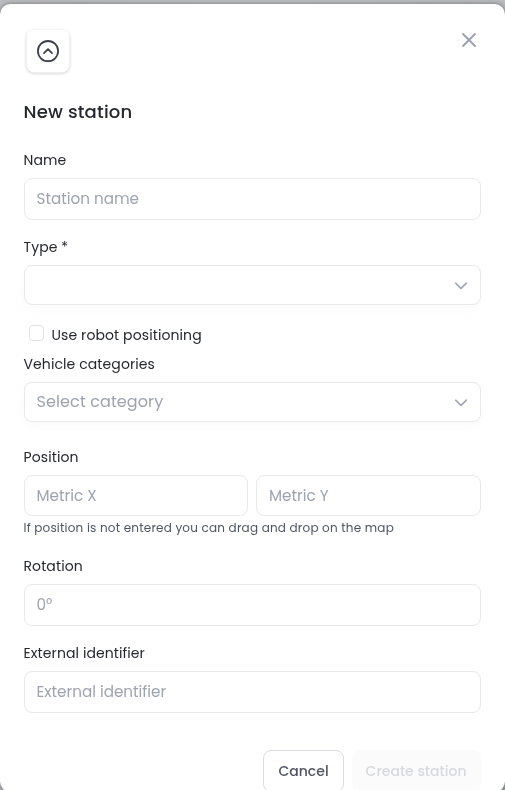
- Name: a name that helps you recognise the station, for example Packing station.
- Type: Default for a normal station, or Traversal for a junction point on an existing path. For a traversal station, click
Create stationand then click the path where you want it. - Use robot positioning: when checked, the station is created at the current position of the robot you select. The robot must be connected.
- Vehicle categories: only robots of these categories can use the station. Leave it empty to allow all robots.
- Position and Rotation: the station’s coordinates in metres and its angle. If you leave the position empty, you can drag the station onto the map after you click
Create station. - External identifier: an optional code to match the station with another system, such as your WMS.
Click Create station to save it.
Station settings
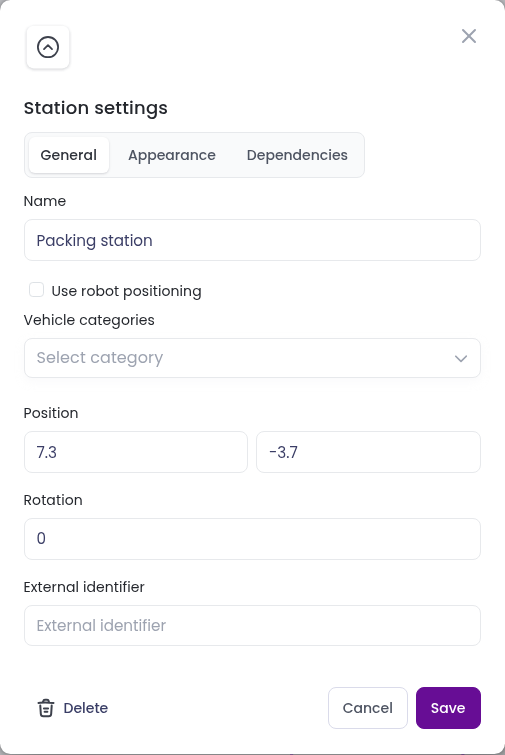
To change a station, hold Shift and click it. The Station settings dialog opens with three tabs:
- General: the same fields as when you create a station. Click
Deleteto delete the station. - Appearance: the station’s colour and icon. You can apply the colour to every station in the team, or to every station and path, and upload your own icon.
- Dependencies: the missions, mission presets and action presets that use the station. You can delete them from here, for example before you delete the station.
Hovering over a station shows a short summary of its type, position and rotation in the top left corner of the map.
Paths
Besides building a network, you can connect stations that already exist by drawing a path or by filling a form.
Draw a path
- Click the station where the path should start.
- Optionally, click on the map to add waypoints and shape the route. Hold Shift to snap waypoints to a grid.
- Click the station where the path should end. The path is saved.
Advanced path
To create a path from a form, click Advanced path in the side toolbar.
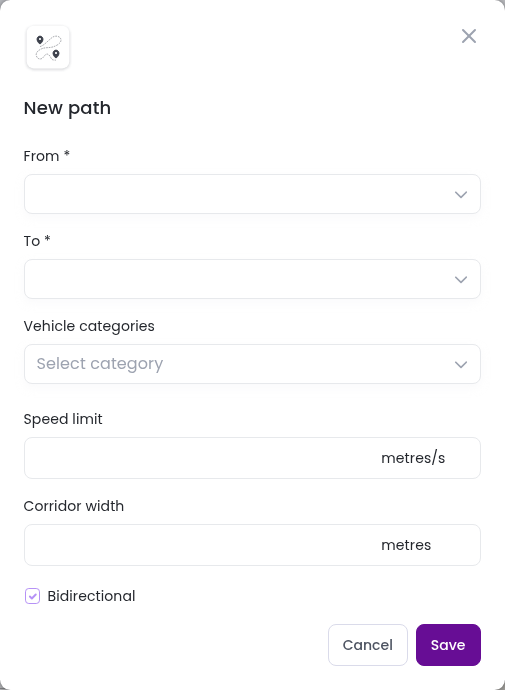
- From and To: the stations the path connects.
- Vehicle categories: only robots of these categories can use the path. Leave it empty to allow all robots.
- Speed limit: the maximum speed on the path, in metres per second.
- Corridor width: the width of the corridor around the path, in metres.
- Bidirectional: when checked, robots can use the path in both directions.
Click Save. Meili plans the route between the two stations and avoids obstacles.
Path settings
To change a path, click it. The Path settings dialog opens.
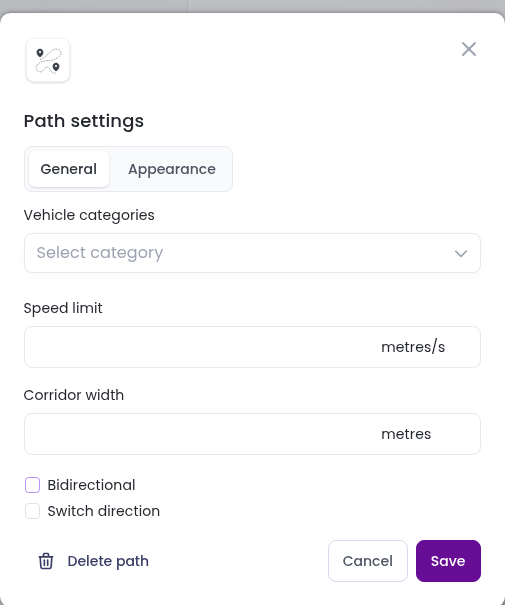
- General: the vehicle categories, speed limit, corridor width and direction. When Bidirectional is unchecked, robots can only use the path in one direction, shown by arrows on the map. Check Switch direction to reverse it. Click Delete path to delete the path.
- Appearance: the path’s colour and thickness. You can apply them to every path in the team.
Move or delete stations and paths
To move stations and path waypoints, or to delete several items at once, see Move stations, paths and zones and Delete stations, paths and zones in the Map editor page.
Robots only receive your changes when you send the map to them.