Triggers
A trigger is a unique web address (URL) that performs one action in your team when it is called. With triggers, simple devices and external systems can launch or confirm missions without using the full Meili API. Examples include a call button at a workstation, a PLC, a door sensor, or your WMS.
Each trigger does exactly one thing, for example “launch the Pallet pickup mission preset” or “confirm the mission step at Loading dock 2”.
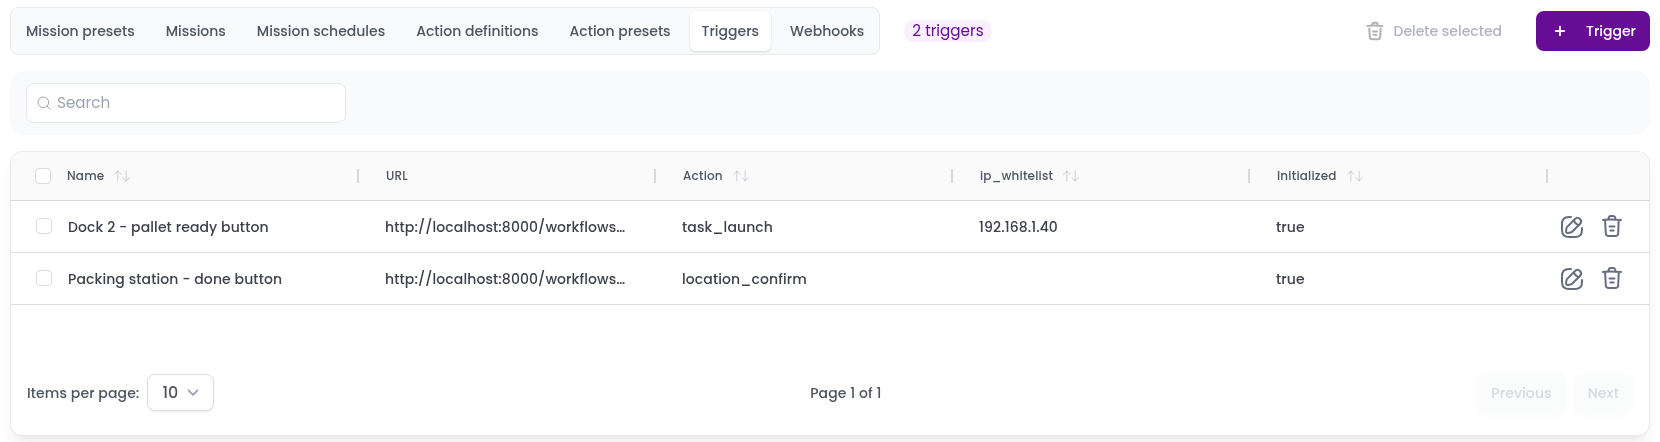
The Triggers tab lists every trigger in the team with its name, URL, action, allowed IP addresses and whether it is initialized. Use the search box to filter the list by name.
Only team owners, admins and maintainers can create, edit or delete triggers.
Trigger actions
When you create a trigger, you choose one of the following actions. The action decides which extra field you must fill.
| Action | Requires | What happens when the URL is called |
|---|---|---|
| Mission launch | Mission preset | A new mission is created from the selected mission preset. |
| Location confirm | Station | Every mission in progress whose current step is at the selected station is confirmed, as if an operator had clicked Click to proceed on the mission card. The mission then moves on to its next step. |
| Location fail | Station | Every mission in progress whose current step is at the selected station is marked as failed. |
| Confirm vehicle | Vehicle | The current step of the mission in progress on the selected vehicle is confirmed. |
If a confirm or fail trigger is called when no mission is waiting at the station or on the vehicle, nothing happens.
Create a trigger
- Inside your team, go to Actions and open the Triggers tab.
- Click the
+ Triggerbutton. A dialog will appear.
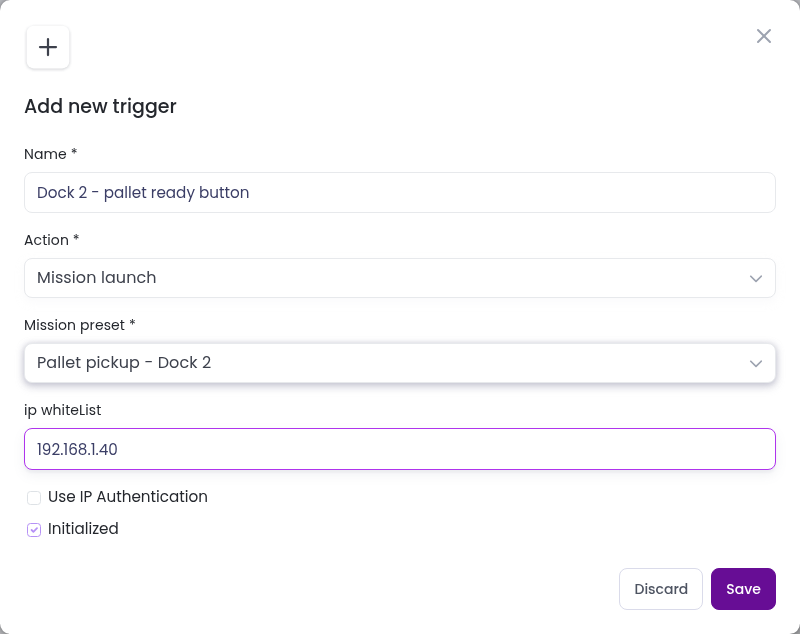
- Fill in the form:
- Name: a name that helps you recognise the trigger, for example Dock 2 - done button. It must be at least 3 characters long.
- Action: one of the trigger actions.
- Mission preset, Station or Vehicle: the field that matches the action you picked.
- ip whiteList: the IP address allowed to call the trigger. It is only checked when Use IP Authentication is enabled. See Restrict access by IP.
- Use IP Authentication: when checked, only requests from whitelisted IP addresses are accepted.
- Initialized: when checked, the trigger performs its action. When unchecked, calls to the trigger don’t perform any action. New triggers are initialized by default.
- Click
Save. The trigger is added to the list together with its URL.
Call a trigger
Copy the trigger URL from the URL column of the table, or from the Edit trigger dialog. It looks like this:
https://<your-meili-instance>/workflows/triggers/<trigger-key>/Configure your device or system to send a POST request to that URL. No login is required. Opening the URL in a web browser does not call the trigger.
For example, from a terminal:
curl -X POST https://<your-meili-instance>/workflows/triggers/<trigger-key>/For a Mission launch trigger, Meili picks the vehicle by default. To send the mission to a specific vehicle, include the vehicle’s UUID in the request:
curl -X POST https://<your-meili-instance>/workflows/triggers/<trigger-key>/ \
  -H "Content-Type: application/json" \
  -d '{"vehicle": "<vehicle-uuid>"}'
Unless IP authentication is enabled, anyone who knows a trigger URL can call it. Treat trigger URLs like passwords and don’t share them publicly.
Restrict access by IP
To make sure only your own devices can call a trigger:
- Enter the device’s IP address in ip whiteList.
- Check Use IP Authentication.
- Make sure Initialized is checked and click
Save.
Requests from any other IP address are rejected.
The IP address that matters is the one the Meili server sees. For a device on a local network, this is usually the public IP address of your site rather than the device’s local address.
Edit a trigger
To edit a trigger, click the edit icon on its row. The Edit trigger dialog shows the same fields as the creation form, plus the trigger URL.
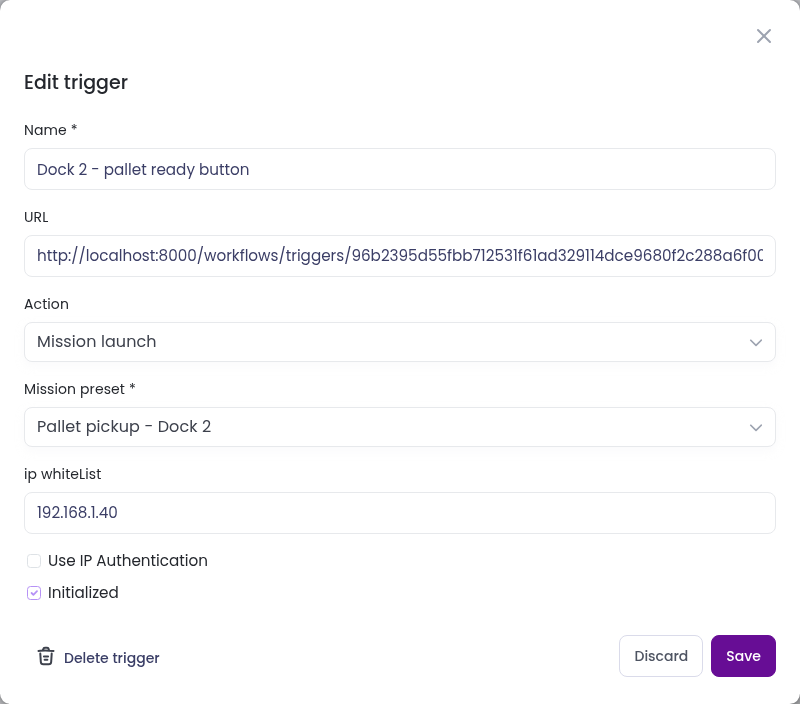
Change the fields you need and click Save. The URL stays the same, so devices that already use it keep working.
You can’t change a trigger’s action after it has been created. To use a different action, create a new trigger.
Delete a trigger
To delete a trigger, click the trash icon on its row, or click Delete trigger in the edit dialog. Confirm the deletion in the popup. To delete several triggers at once, select them with the checkboxes and click Delete selected.
Once a trigger is deleted, its URL stops working. Deletion can’t be undone.