Vehicles
The Vehicles page lists every vehicle in your organisation, across all teams. Here you add new vehicles, change their settings and manage vehicle categories.
To open it, click Manage organisation and select Vehicles in the top menu.
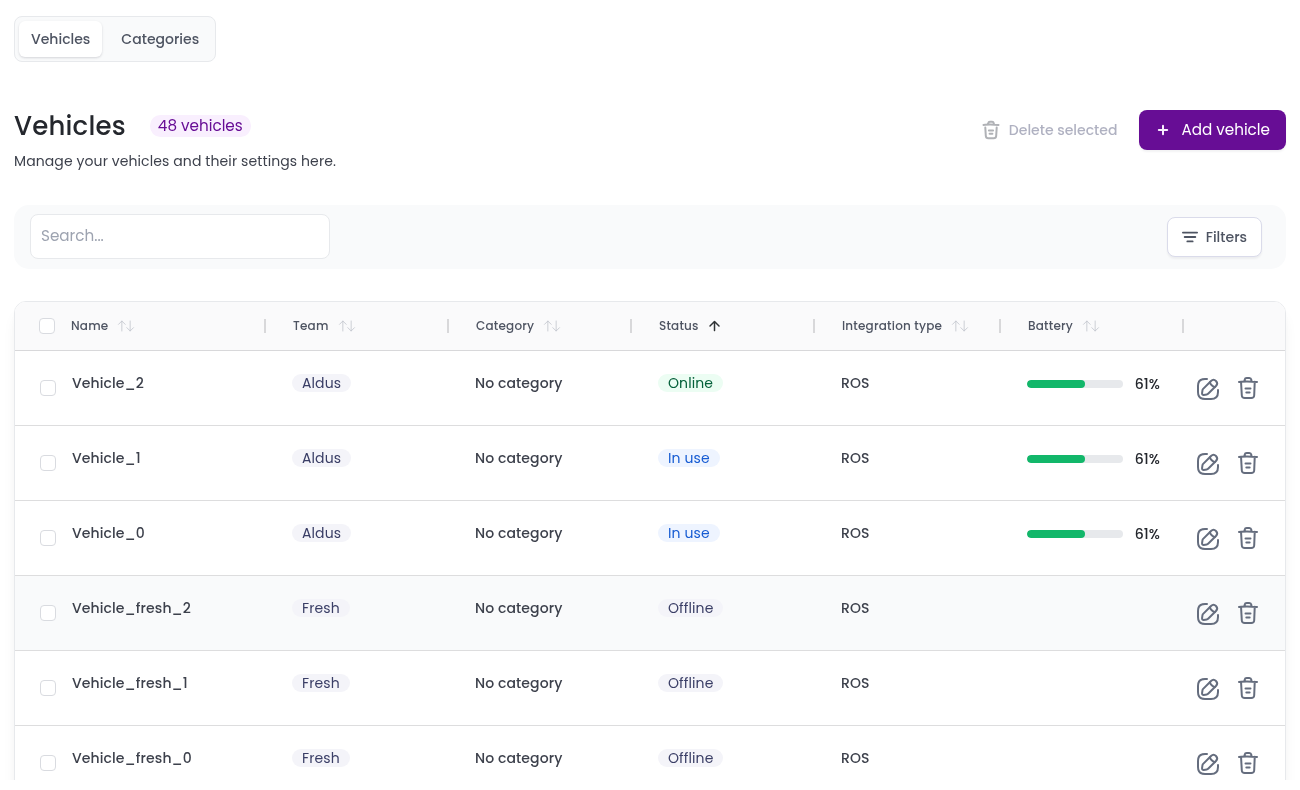
The table shows each vehicle’s Name, Team, Category, Status, Integration type and Battery. Use the search box to find a vehicle by name, or click Filters to show only certain teams, categories or integration types.
Add a vehicle
- Click
+ Add vehicle. - Fill in the General tab. Team and Vehicle type are required.
- (Optional) Adjust the Traffic control and Dimensions tabs.
- Click
Save.
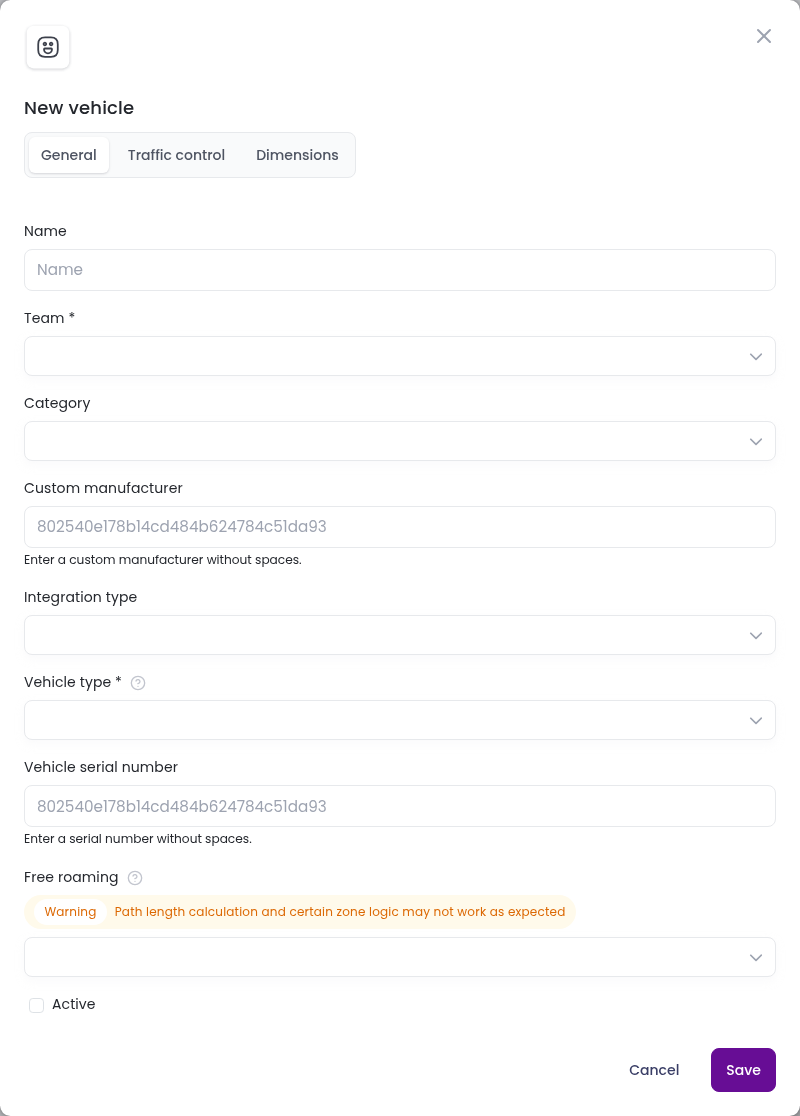
General
- Name: the name shown for the vehicle everywhere in the dashboard.
- Team: the team the vehicle works for. A vehicle only receives missions from its own team.
- Category: the vehicle category, for example a model or a load class.
- Custom manufacturer and Vehicle serial number: identify the vehicle when it connects to Meili. Enter them without spaces. For VDA5050 vehicles, see VDA5050 topics.
- Integration type: how the vehicle connects to Meili, for example ROS, MiR or VDA5050. See How to integrate your robots.
- Vehicle type: what Meili can do with the vehicle. See Vehicle types.
- Free roaming: whether the vehicle can drive outside the paths drawn in Meili. See Free roaming.
- Active: check it so the vehicle can receive missions.
Traffic control
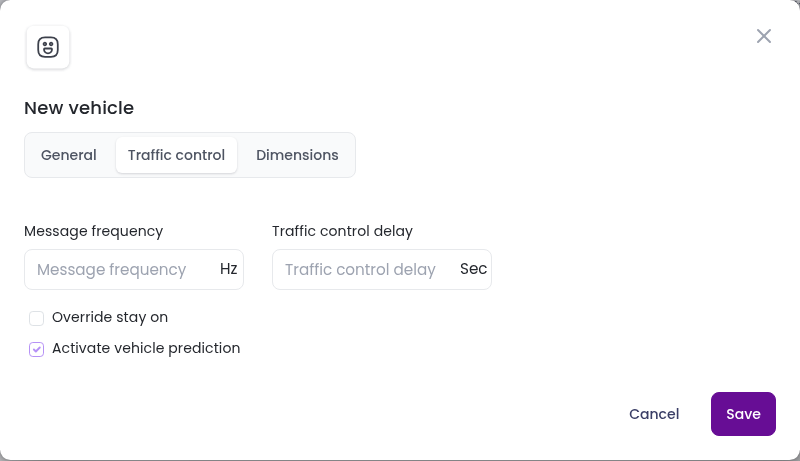
- Message frequency (Hz): how often the vehicle sends updates to Meili. The default is 1 Hz.
- Traffic control delay (s): an extra delay that traffic control takes into account for this vehicle’s messages. The default is 0 s.
- Override stay on: when this vehicle is following another one, Meili normally gives way to the vehicle in front. With this option on, the priority of their missions decides instead. See Traffic control.
- Activate vehicle prediction: on by default. Turn it off if the vehicle doesn’t follow the paths planned by Meili.
Dimensions
The Length, Width and Height of the vehicle, in millimetres. Meili uses them for traffic control. If you leave them empty, the dimensions of the vehicle’s category are used.
Vehicle types
- AMR: autonomous mobile robots that run missions managed by Meili FMS.
- AGV_MANAGEABLE: automated guided vehicles (AGVs) that run missions managed by Meili FMS.
- AGV_NON_MANAGEABLE: AGVs that don’t run missions from Meili FMS, but are tracked by traffic control.
- RTLS: tracked through a real-time location system. They don’t run missions from Meili FMS, but are tracked by traffic control.
- VISUALIZE: shown on the map only. They don’t run missions and aren’t tracked by traffic control.
Edit a vehicle
Click the edit icon on the vehicle’s row. Besides the tabs used when adding a vehicle, you will find:
- Battery: when the vehicle charges. See Battery settings.
- Appearance: the colour and icon of the vehicle on the map. You can apply them to all vehicles in the team or in the same category, upload your own icon, or reset to the default.
- Maintenance: the Next maintenance time of the vehicle. Turn on Maintenance notifications to be reminded.
- Map offsets: appear once a map from the vehicle has been uploaded.
- Map IDs: the vehicle’s own ID for each floor of the team. See Map IDs.
- Factsheet: only for VDA5050 vehicles. See VDA5050.
Click Save to apply your changes.
Battery Settings
The battery settings decide when a vehicle is sent to charge and when it is ready to work again. To open them, click the edit icon on the vehicle’s row and open the Battery tab.
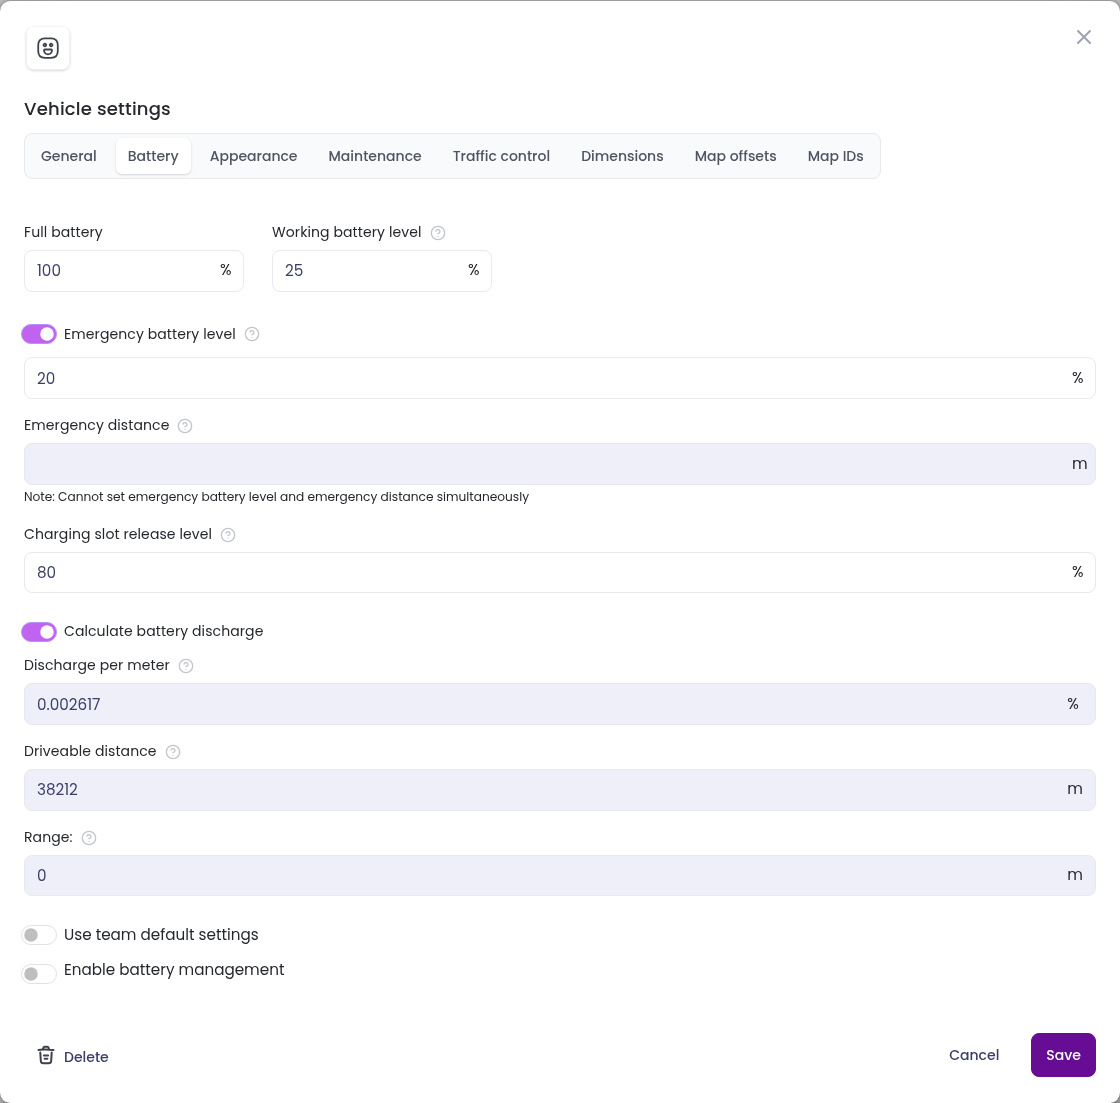
The tab contains the following settings:
- Full battery: the battery level of the vehicle when it is fully charged, normally 100%. Meili sets it automatically from the highest level the vehicle has reported.
- Working battery level: the level a charging vehicle must reach before it can take missions again.
- Emergency battery level: the level at which the vehicle is sent to charge. Turn the switch next to it on to use this level, or off to use an Emergency distance instead.
- Emergency distance: the vehicle is sent to charge when the distance it can still travel drops to this value. You can set either this or the emergency battery level, not both.
- Charging slot release level: above this level, a charging vehicle can give its charger to a vehicle that needs it more. Requires a free resting station.
- Calculate battery discharge: when on, Meili learns from the vehicle’s missions how much battery it uses per meter and shows it in Discharge per meter. When off, enter the value yourself in User defined discharge per meter. The default is 0.05%. Meili uses this value to estimate how far the vehicle can travel.
- Driveable distance: how far the vehicle can travel on a full battery. Calculated by Meili.
- Range: how far the vehicle can travel with its current battery. Calculated by Meili.
- Use team default settings: use the battery levels set for the whole team in Site settings instead of the values entered here.
- Enable battery management: turn this on so that Meili sends the vehicle to charge automatically and checks its battery before giving it a mission.
Click Save to apply the changes.
For how these levels work together and how Meili picks a charger, see Charging.
Delete a vehicle
Click the trash icon on the vehicle’s row and confirm. To delete several vehicles at once, select them with the checkboxes and click Delete selected. Deletion can’t be undone.
Vehicle categories
Categories group vehicles of the same kind, for example the same model or load capacity. You can use them to:
- send a mission only to vehicles of a certain category,
- allow only certain categories into a zone,
- apply the same colour and icon to every vehicle of a category, and
- give vehicles default dimensions.
To manage them, open the Categories tab at the top of the Vehicles page.
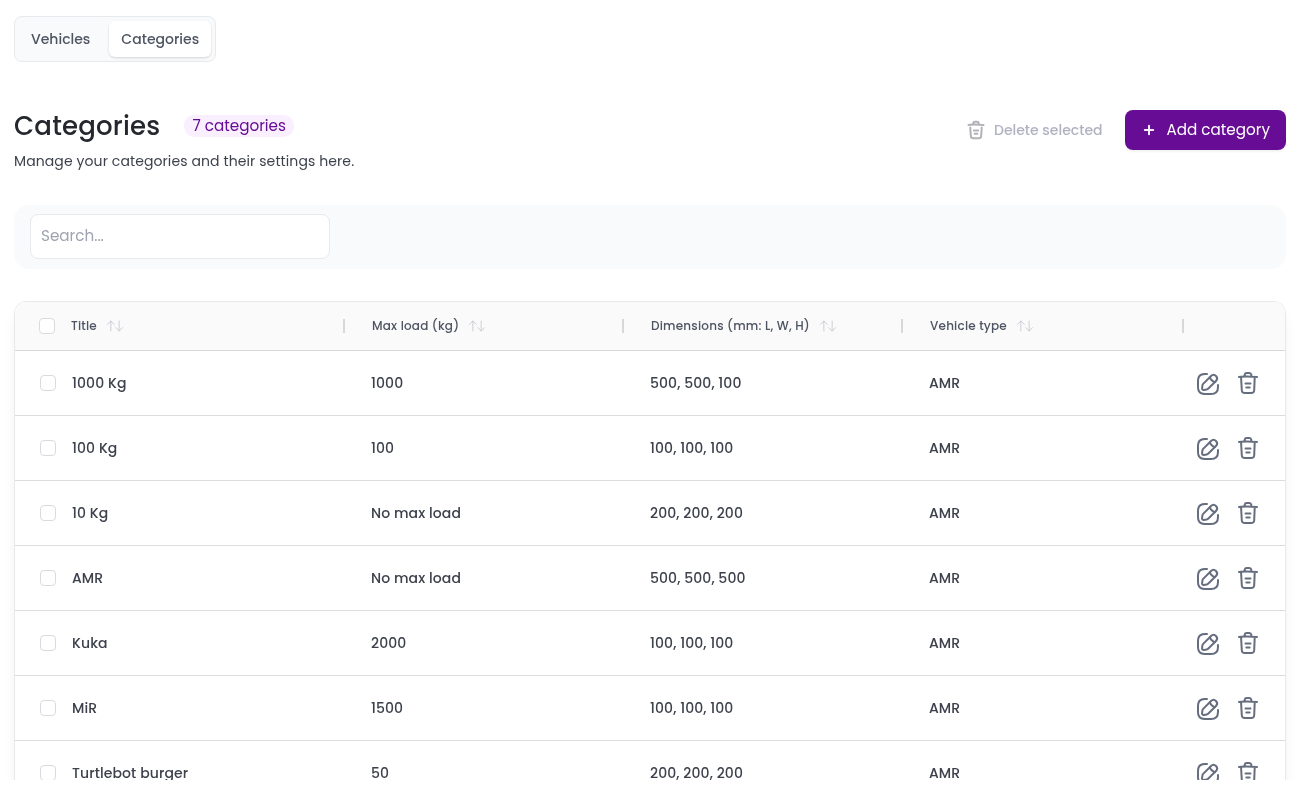
To add a category, click + Add category and fill in:
- Name (required)
- Max load (kg): the maximum load vehicles of this category can carry.
- Vehicle type (required): see Vehicle types.
- Extra details: any notes you want to keep.
- Dimensions tab: the Length, Width and Height of vehicles in this category, in millimetres.
Click Save. Then assign the category to vehicles in the General tab of each vehicle. To edit or delete a category, use the icons on its row.