Integration Skeleton#
In order to help clients integrate their vehicles with Meili, we provide an integration skeleton, based on meili-sdk, which can be used as a starting point for creating a custom integration. This skeleton includes basic implementations for common functionalities such as vehicle status management, map synchronization, and task handling. Users are required to create their own connector and translator implementations following the provided interfaces and examples.
Why we need this integration code?#
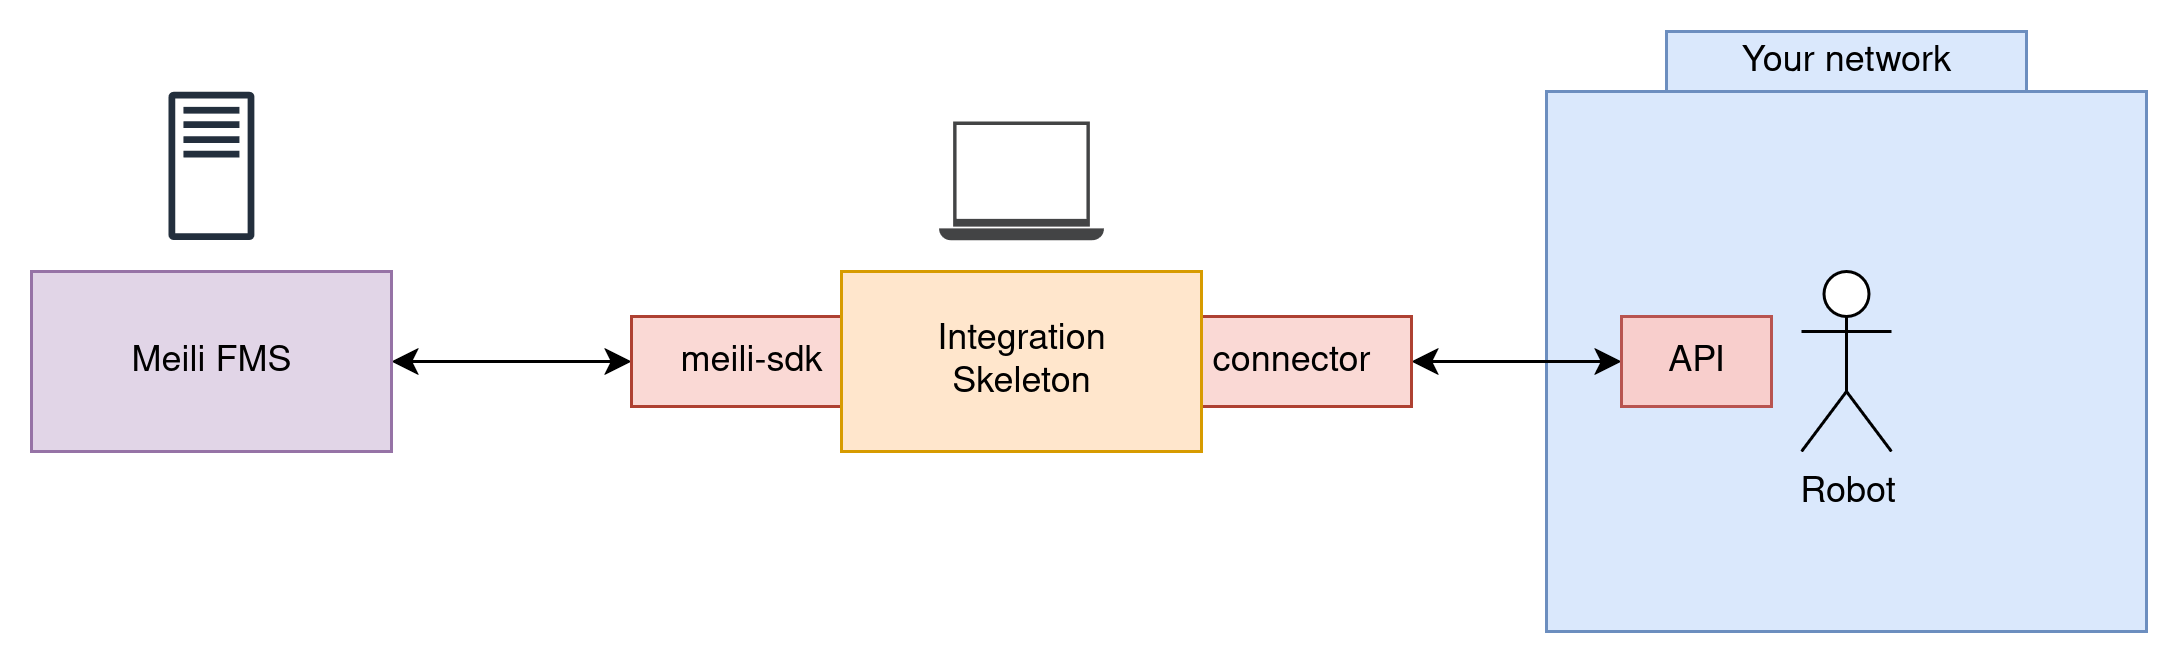
Each vehicle operates with its own unique communication protocol and message format, which makes direct integration with Meili challenging. To support a wide range of vehicles, we provide a flexible solution that adapts each vehicle’s protocol and message format to Meili’s internal standards. This is the role of the integration code.
The integration code serves as a bridge between Meili and the vehicle, ensuring seamless communication by translating messages and managing interactions. This approach allows Meili to remain agnostic of the vehicle’s specific implementation details, enabling scalability and easier support for new vehicle types. By using this integration code, clients can quickly onboard their vehicles into the Meili ecosystem without needing to modify their existing systems.
To function effectively, the integration code must run in an environment that has direct access to the vehicle’s network or can communicate with the vehicle’s API. Clients can deploy this code on a server or device within the same network as the vehicle, ensuring smooth and efficient integration.
Structure#

Current Features#
- Vehicles status management
- Map details and station synchronization
- Task handling and update:
- Task creation
- Task status updates
Getting Started#
Prerequisites#
- Python 3.8 or higher
- pip (Python package installer)
- Access to the vehicle’s API or network
Installation#
Warning
In order to be able to access the integration skeleton code, you need to have access to Meili’s GitLab repository. Please ask Meili for an access token if you don’t have one.
-
Clone the repository:
git clone git@gitlab.com:meilirobots/integrations/integration-skeleton.gitor using HTTPS:
git clone https://gitlab.com/meilirobots/integrations/integration-skeleton.git -
Navigate to the project directory:
cd integration-skeleton -
(Optional) Create and activate a virtual environment:
python -m venv integration_env source integration_env/bin/activate # On Windows use `integration_env\Scripts\activate` -
Install the required dependencies:
pip install -r requirements.txt
Running the Integration#
- Configure the integration by setting up environment variables as needed (see Environment Variables section).
- Run the integration:
python main.py
Creating a Custom Integration#
The user must implement the following components:
- Connector: Responsible for communication with the vehicle.
- Translator: Responsible for translating messages between Meili and the vehicle.
Implementing Your Own Connector and Translator#
To get started quickly, you can implement your own connector and message translator by editing the following files:
src/connector/user_connector.py: Inherit fromBaseConnectorand implement the required methods for your vehicle integration.src/connector/translator/user_message_translator.py: Inherit fromMessageTranslatorand implement the required translation logic.
These files provide empty classes with all required methods raising NotImplementedError, so you can fill in your own logic as needed.
Creating a Message Translator#
The main goal of the message translator is to convert messages between Meili’s internal format, the vehicle’s format, and the integration’s database models in order to facilitate communication. Users need to implement a custom message translator knowing the vehicle’s message format and the given information about Meili’s internal message format and database models.
To create a custom message translator, follow these steps:
- Open the file
src/connector/translator/user_message_translator.py. It can be renamed if desired. - Implement the required abstract methods defined in the
MessageTranslatorinterface. The docstrings in the interface provide guidance on what each method should do and the expected input/output. - Replace the default translator
DefaultMessageTranslatorin imports and declarations with your custom translator class.
The DefaultMessageTranslator can be used as a reference implementation.
Creating a Connector#
Connectors handle communication with the vehicle. This communication can follow two main approaches:
-
Polling-based Connectors
These connectors periodically request updates from the vehicle and send commands when needed. A typical example is an HTTP-based connector.
A base class for polling-based connectors is available insrc/connector/api/api_connector.pyand can serve as a starting point for implementation. -
Streaming-based Connectors
These connectors maintain a persistent connection with the vehicle. The vehicle pushes updates either periodically or in response to events, eliminating the need for polling. Typical examples include MQTT, ROS, or WebSocket-based connectors. Implementing a streaming connector is more complex, as it requires a background process to listen for incoming messages and update local storage. When the integration skeleton requests the vehicle’s status, the connector should return the most recent data from this storage. Commands can still be sent directly to the vehicle, similar to polling-based connectors.
A base class for streaming-based connectors is available insrc/connector/mqtt/mqtt_connector.py, though it is not yet fully implemented.
It is also possible to create hybrid connectors that combine both approaches, depending on the vehicle’s capabilities and requirements. The abstraction layer provided by the BaseConnector interface allows for flexibility in implementation.
To create a custom connector, follow these steps:
- Open the file
src/connector/user_connector.py. It can be renamed if desired. - Implement the required abstract methods defined in the
BaseConnectorinterface. The docstrings in the interface provide guidance on what each method should do and the expected input/output.
Registering the Connector#
- Open
src/connector/connector.py. - Import your custom connector and translator classes.
- In the
Connectorclass’s__init__method, replace the default connector and translator with your custom implementations. - Ensure that the rest of the
Connectorclass methods correctly utilize your custom connector and translator.
Additional Configuration#
Some parts of the code have been marked with the tag # USER: to indicate where users may need to make additional changes or configurations specific to their integration.
Database models can also be customized as needed. Refer to the existing models in src/database/models/ for guidance.
An example of when a custom model might be needed is if the vehicle needs a user and password for authentication, this could be stored in a custom Credentials model.
Map Synchronization#
The reference systems used by the FMS and the vehicles may differ. To ensure accurate positioning, the integration needs details about the vehicle’s map, such as its origin and resolution. This information should be provided by the connector. If the connector cannot supply it, update the code to retrieve these details from another source, such as a configuration file.
Station Synchronization#
The FMS and the vehicle must share information about available stations. During map synchronization, the integration exchanges station lists in both directions: the FMS sends its stations to the vehicle, and the integration retrieves the vehicle’s stations to send to the FMS. The integration maps station UUIDs between the FMS and the vehicle, enabling correct translation of station references in tasks.
If the vehicle does not support creating stations, the environment variable FMS_TO_VEHICLE_STATION_SYNC_AVAILABLE can be set to false to disable sending stations from the FMS to the vehicle.
Environment Variables#
This integration supports configuration through environment variables. It’s recommended to create a .env file in the project root to manage these settings.
Available Environment Variables#
| Variable | Default Value | Description |
|---|---|---|
DEBUG |
false |
Enable debug logging when set to any value |
DB_LOCATION |
default.sqlite3 |
Path to the SQLite database file |
FMS_TO_VEHICLE_STATION_SYNC_AVAILABLE |
true |
Enable/disable FMS-to-vehicle station synchronization |
Creating a .env File#
Create a .env file in the project root with your desired configuration:
DEBUG=true
DB_LOCATION=my_integration.sqlite3
FMS_TO_VEHICLE_STATION_SYNC_AVAILABLE=false
The application will automatically load these variables when it starts.
Tasks#
Basic implementation of tasks consist on move_to_point tasks, which instruct the vehicle to move to a defined station. If waypoints are needed, they are also received in the task argument in the function task_v2_handler. The user should integrate the needed logic to handle sending each waypoint to the vehicle one by one if needed.
The FMS sends the task’s subtasks one by one, waiting for the integration to confirm that the previous subtask was completed before sending the next one.
For example, if a task has:
- Move to Point A
- Move to Point B
- Move to Point C
The FMS will first send the subtask to move to Point A. The integration should send the command to the vehicle and wait for the vehicle to confirm that the task has started, then update the task status to IN_PROGRESS. Once the vehicle reaches Point A and confirms it, the integration should update the task status to COMPLETED. Only then will the FMS send the next subtask to move to Point B, and so on.